


There are many reasons why taking a screenshot on a Lenovo ThinkPad is essential. It allows you to capture an image of what is on your screen at a given moment. This can be useful for keeping track of important information or sharing something you find interesting with others.
Additionally, screenshots can be used as documentation, providing visual evidence of something that occurred on your screen. Finally, screenshots can be fun to capture memories of your favorite moments while using your Lenovo ThinkPad.
If you are finding it confusing to take screenshots from your laptop, such as Lenovo ThinkPad E585, then here’s a detailed guide for you.
Table Of Contents
- 1 4 Ways to Take Screenshot on a Lenovo ThinkPad
- 2 How to screenshot on Lenovo ThinkPad with Windows 10
- 3 How to take screenshot in Lenovo ThinkPad using Windows 11
- 4 Screenshot not Working on Lenovo ThinkPad: Solutions
- 5 Taking Screenshots on ThinkPad without PrintScreen Button
- 6 Steps to take Screenshots on a Lenovo Tablet
- 7 Frequently Asked Questions
- 8 Bottom Line
4 Ways to Take Screenshot on a Lenovo ThinkPad
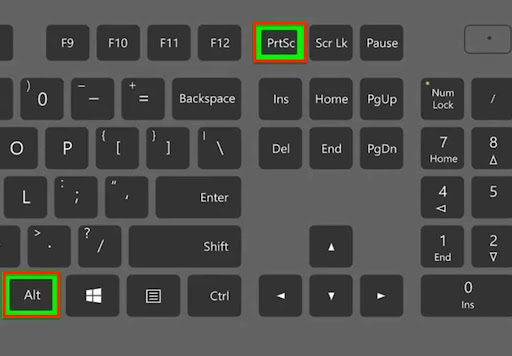
1. To take a screenshot on a Lenovo Thinkpad, press the “PrtScr” key. This will take a picture of your entire screen and copy it to your clipboard. You can then paste it into any image editing program to save it.
2. If you only want to screenshot a specific area of your screen, you can use the “Snipping Tool” included with Windows. Press the “Start” button and type “Snipping Tool” into the search box to use it. Then, click on the “Snipping Tool” icon to open it.
3. Click on the “New” button to take your screenshot. You can then use your mouse to select the area of your screen that you want to capture. Once you have selected the area, release the mouse button, and your screenshot will be taken.
4. You can also take a screenshot by using the “Print Screen” button on your keyboard, which will only capture your entire screen.
How to screenshot on Lenovo ThinkPad with Windows 10
- First, ensure that the screen you want to screenshot is open and visible on your Lenovo.
- To take a screenshot, press the Windows logo key + PrtScn key.
- Your screenshot will now be saved as a PNG file in the “Screenshots” folder, which you can access by opening the File Explorer and clicking on “This PC.”
- To find your screenshot more efficiently, click on the “Date Modified” column to sort your files by when they were last edited.
- If you want to take a screenshot of only a specific part of the screen, you can use the Snipping Tool. To open it, press the Windows logo key + R, type “snippingtool,” and press Enter.
- Once the Snipping Tool is open, click the “New” button to select the screen area you want to screenshot.
- After you’ve selected the area, the screenshot will be saved as a PNG file in the “Screenshots” folder.
- You can also use the Snipping Tool to screenshot a specific window. To do this, open the window you want to screenshot and press Alt + PrtScn.
- The screenshot will be saved as a PNG file in the “Screenshots” folder.
How to take screenshot in Lenovo ThinkPad using Windows 11
You can use the Snipping Tool to take a screenshot on a Lenovo laptop running Windows 11. This tool allows you to capture a portion of your screen as an image.
To open the Snipping Tool, go to Start > All Programs > Accessories > Snipping Tool.
Once the Snipping Tool is open, you can select the area of your screen that you want to capture. To do this, click and drag your mouse over the desired area. Once you release the mouse button, the selected area will be highlighted.
To capture the highlighted area, click the “Save Snip” button. This will open a Save Dialog, where you can choose the location to save the screenshot.
Once you’ve saved the screenshot, you can open it in an image editor or viewer to view or share it.
Screenshot not Working on Lenovo ThinkPad: Solutions
There are a few potential solutions to this problem:
Update your graphics drivers
If your graphics drivers are outdated, it’s possible that they may not be compatible with your laptop’s hardware and/or the screenshot function. Updating your drivers should resolve the issue.
Use a different screenshot tool
There are several different screenshot tools available, both free and paid. If the screenshot function isn’t working with the default tool with your laptop, try using a different one.
Use an external keyboard
If your laptop’s built-in keyboard doesn’t have a dedicated screenshot button or key combination, you can try using an external keyboard that does. This should allow you to take screenshots without any issues.
Restart your laptop
If all else fails, restarting your laptop may resolve the issue. After restarting, try retaking a screenshot and see if it works.
Hopefully, one of the above solutions will fix the problem, and you’ll be able to take screenshots on your Lenovo laptop without any issues.
You can also take a screenshot by pressing the “Print Screen” key on your keyboard. This will capture the entire screen and save it to your clipboard. To keep the screenshot, you’ll need to open an image editor or viewer and paste the image from the clipboard.
Taking Screenshots on ThinkPad without PrintScreen Button
There is no standard way to take a screenshot on a Lenovo laptop without using the PrintScreen button. However, some Lenovo laptops have a function key that will allow you to take a screenshot. Consult your laptop’s manual to determine if your Lenovo laptop has this function key.
If your Lenovo laptop does not have a function key for taking screenshots, you can use the Windows Snipping Tool. To launch the Snipping Tool, press the Windows key + R, type snippingtool, and press Enter.
Once the Snipping Tool is open, you can take a screenshot of your entire screen or select a specific area to screenshot.
To take a screenshot of your entire screen, click the Full-screen Snip button.
Click the New button to take a screenshot of a specific area on your screen. Then, use your mouse to select the area you want to screenshot.
Steps to take Screenshots on a Lenovo Tablet
- Press and hold the power and volume buttons down at the same time.
- Hold the buttons until you hear a shutter sound or see a screen flash, indicating that a screenshot has been taken.
- Screenshots are automatically saved in the “Screenshots” folder in the Gallery app.
- Open the Gallery app and tap the “Screenshots” folder to view, edit, or share your screenshot.
Taking Screenshots on Different Android Versions using Lenovo Tablets
- To take a screenshot on a Lenovo tablet running Android 6.0 or higher, press and hold the power and volume down buttons simultaneously. There is no need to hold the buttons down for a specific amount of time.
- If you’re using a Lenovo tablet with a physical home button, you can also take a screenshot by pressing and holding the home button and power button simultaneously.
- To take a screenshot on a Lenovo tablet running Android 5.0 or lower, you’ll need to simultaneously press and hold the power button and volume down button.
- You can also take a screenshot by swiping three fingers across the screen from left to right.
- Using a Lenovo Yoga tablet, you can simultaneously take a screenshot by pressing the Volume Up and Volume Down buttons.
Frequently Asked Questions
Here are the frequently asked questions about taking screenshots on your Lenovo Laptop or PC.
Q1. How do I take a screenshot on my Lenovo laptop without Print Screen key?
You can take a screenshot on your Lenovo laptop without Print Screen key using Snipping Tool.
Q2. How do I take a screenshot on my Lenovo laptop with Windows 10?
You can take a screenshot on your Lenovo laptop with Windows 10 using any above methods.
Q3. How do I print a screenshot on my Lenovo laptop?
To print a screenshot on your Lenovo laptop, open Google Chrome and press Ctrl + P. Next, click on the 3 dots on the top right, click Print, and click Change under Destination. Now, select the Save as PDF option and click Save.
Q4. How do I take a screenshot on my Lenovo laptop with Windows 7?
Using the Snipping Tool, you can take a screenshot on your Lenovo laptop with Windows 7.
Q5. How do I take a screenshot on my Lenovo laptop with Windows 8?
You can take a screenshot on your Lenovo laptop with Windows 8 using any above methods.
Bottom Line
There are many ways to take screenshots on a Lenovo ThinkPad, and the best method depends on your needs. If you need to capture what’s on your screen, the simplest way is to use the Print Screen button. You can use the Snipping Tool or Snagit for more control over your screenshots.
No matter which method you use, taking screenshots on your Lenovo ThinkPad is easy and can be a helpful way to capture information or share what’s on your screen with others. I also have another article explaining how to screenshot only one monitor when using a multi-screen setup.