

")
Want to know how to record a Skype meeting? Be it a business meeting, study discussion, or some family get-together. Skype and Skype for Business are separate software, and allow you to take advantage of extra features like a recording.
Business enterprises use Skype for Business to streamline their business and communication needs. This tool offers solutions for many entrepreneurs and small-time businesses to record and manage their corporate recordings since it is an efficient and inexpensive platform offering excellent features.

In the content below, we will be looking at how to record Skype meetings on Windows and Mac, along with free recording software with better features as an alternative.
Table Of Contents
Setting Recording Options Before Recording
Skype allows users to customize many options, like customizing Skype virtual background. Now, before moving on to the recording steps part, let us see how we can customize the recording options on Skype for Business to manage the files later.
The two ways you can follow to open these settings are:
Option 1. You can Hit on the Gear Icon right next to the options. This will invoke an Options dialog box. Or select the downward-facing arrow next to the settings, then navigate to Tools > Options.
Option 2. A list of settings you can tweak around appears on the left pane in the Skype for Business options window. Now, click on the “Recording” settings.
After setting the recording options, you can now follow the methods below to record Skype Meetings on Windows/Mac easily.
How to Record Skype Meetings on a PC
Microsoft has yet to give its nod to Skype for businesses to record videos on Mac. According to the company’s guidelines, recording on Mac using Skype has yet to be introduced. Therefore, if you want to record a Skype meeting on any computer, try a third-party tool – EaseUS RecExperts.
EaseUS RecExperts stands out as a professional screen and video recorder with excellent features. It records Skype meetings with a virtual background. You can replace the original meeting background with a classroom, studio, scenery, etc. Blurring the surroundings is also easy for it. It even offers an AI assistant to extract the meeting discussion as a text file. Scheduling recording tasks can let it record automatically.
Record Skype meetings via EaseUS RecExperts now:
Step 1. Go to the video meeting that you want to record and launch EaseUS RecExperts on your devices. Choose the “Full Screen” recording mode to record the whole screen or the “Region” mode to record your customized area.
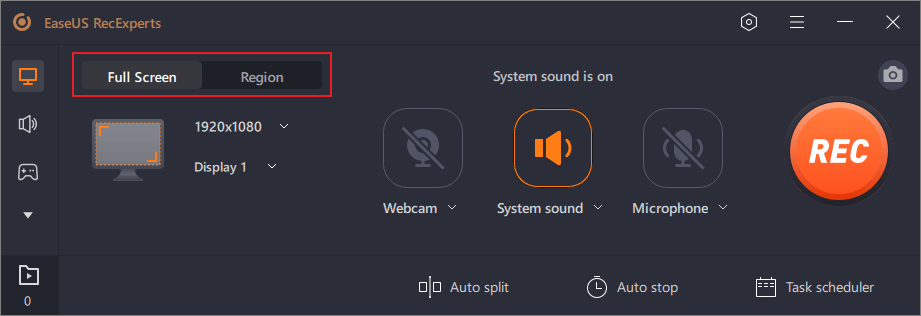
Step 2. Then, choose to record the system sound, microphone sound, webcam, or none by clicking on the according buttons. You can even record a webcam with an AI background. When all is done, click on the red “REC” button to begin.
Step 3. The recording process will start after a three-second countdown. If you want to pause the recording, click on the white double vertical bar (“F10”). To end the recording, click on the red square sign (“F9”).

Step 4. It saves your recordings in MP4, GIF, AVI, and more. After recording, you will be led to the recording list interface. Here, you can even use the AI assistant to export meeting discussions to text files.
Related: How to Add Text to a PDF Document on Windows/Mac
How to Manage Recordings
Now that you have a screen recording of your Skype meeting, let us see how to manage and share it. Skype for Business Recording Manager can be accessed in two ways. Here you can operate on recorded videos and make them ready for publishing.
The first method is to access the recorded files from the Skype for Business main window. A menu appears if you press the downward arrow or drop-down symbol next to the gear icon (Settings). Now, hover over the Tools and then select the Recording Manager.
Or a rather easy way, but it can only help if you are in a meeting. You can select More Options and select Manage Recordings right under the Start/Stop Recording.

In Skype for Business Recording Manager, you can preview/view the recording, rename it, delete it, browse the location, and publish it.
For sharing with other participants, you can use the publish button. Once you click the Publish button, a “Save and Publish Windows opens with options to name the file, select the location for saving, and options to choose what parts of the recording you want to include, like video, audio, messaging, and presentations.
Now, when you feel everything is set, just press OK to save it and share it with the participants later.
Conclusion
Preserving a video to cherish or revisit it for some purpose is a great option, and Skype for Business allows you to record Skype meetings on Windows, but the feature is yet to come for Mac users. This post helps you in learning how to record Skype meetings on Windows and introduces the powerful screen recording tool EaseUS RecExperts for Mac. Hope this post helps.