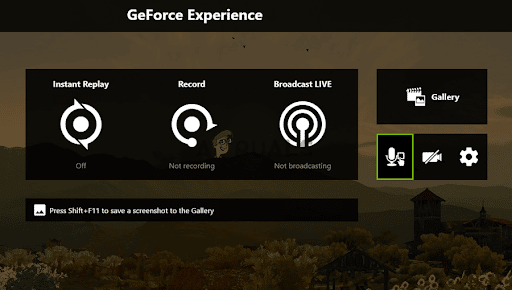
Nvidia Overlay is a feature that allows you to record and share your gameplay directly from your GeForce Experience™ client. To capture and share footage, simply press Alt+Z to open the overlay, then click the “Record” or “Share” icons. You can also customize your settings to determine the type of content you want to capture, how long you want to record and more.
With Nvidia Overlay, you can easily share your best gaming moments with your friends and the gaming community. So what are you waiting for? Try it out today!
To open Nvidia Overlay, please refer to the following instructions:
- Simply starting up your game will turn on the overlay feature.
- To open Nvidia Overlay, press and hold the Alt key while also pressing Z.
- If an overlay is not displayed, you will need to launch the GeForce Experience software in the background. After that, click the option labeled Share.
- When the overlay appears in the game, you can let go of the keys
- After that, you’ll need to click the button to record videos, take screenshots or broadcast the game live.
Table Of Contents
How to Turn Off Nvidia Overlay Notification
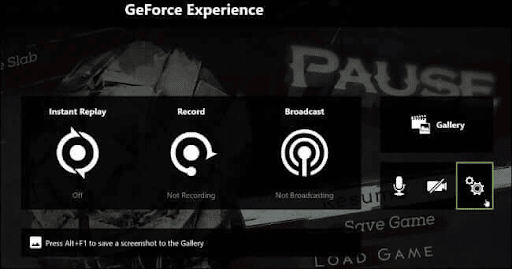
- To open the Nvidia Overlay, press the Alt + Z keys simultaneously.
- Navigate to the right-hand side of the screen and click on the Settings icon.
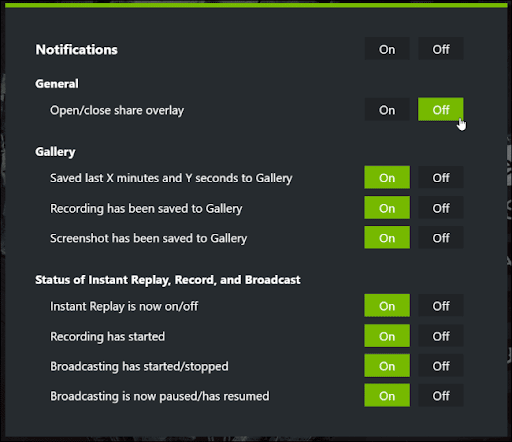
- On the next screen, click the Notifications option.
- The next step is to turn off the Open/Close share Overlay notification.
Why Can’t I Open the Nvidia Overlay?
There are a few potential causes why the Nvidia Overlay won’t launch for you:
- Outdated or faulty drivers: The NVIDIA driver installation package is used to improve the NVIDIA Overlay. Updated drivers have been reported to fix the issue for many users.
- Third-party services: It is essential to disable third-party services for the time being since specific issues could potentially cause NVIDIA Overlay to malfunction briefly. If the issue has been rectified, you are free to switch them back on.
- Visual C++ Redistributable package problems: Because issues with the Visual C++ Redistributable package cause the NVIDIA Overlay to malfunction, in some instances, you will need to restore the installation of the NVIDIA Overlay to fix the issue.
- Media Feature Pack unavailable: Users of Windows N have stated that they could not resolve the issue until they installed Microsoft Media Feature Pack, which adds some missing media functionality to Windows.
- Steam capture configurations: An example of software that may cause NVIDIA Overlay to malfunction is Steam. Some tweaks here and there in the settings might be all that’s needed to get rid of the issue.
- Spotify music player: Spotify has some overlay capabilities that need to be turned off for NVIDIA Overlay to function correctly. You’ll also need to turn off hardware acceleration to fix the issue.
- Admin permissions: One of the most straightforward solutions to the issue, which has proven effective for many users, is to grant the executable file for GeForce Experience administrator permissions.
How to Open Nvidia Game Filter
Here’s how to open the Nvidia Game Filter:
- Enable experimental features in GeForce Experience by going to “Settings”> “General” and checking the box next to “Enable Experimental Features.”
- You can directly access Freestyle by hitting the “Alt+F3” button, or you can bring up the in-game overlay by pressing “Alt+Z” and clicking the “Game Filter” button.
- Once the Game Filter Overlay has been loaded, you can add a new filter to the game by clicking on the “+” icon, which will stack other filters. You can save these configurations in one of three slots available for each game, and switching between them is as simple as pressing a hotkey.
- To create personalized hotkeys for these operations, use the “Alt+Z” key combination and then go to the “Settings” menu and select the “Keyboard Shortcuts” option.
How to Open Nvidia Overlay Without Alt Z
If you’re having trouble with the Alt + Z shortcut, try this instead:
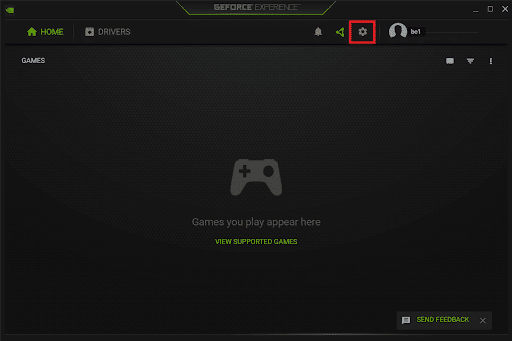
- Launch GeForce Experience, and click on the cog (gear) symbol to access the Settings menu.
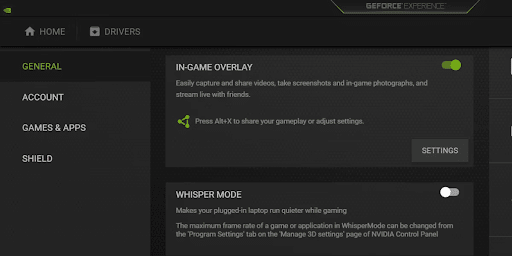
- Choose GENERAL from the left menu, and flip the switch to activate the in-game overlay.
- Start a game and check to see if the GeForce overlay is displayed.
How to Open Nvidia Overlay in Warzone
Here’s a quick rundown of how to open NVIDIA Overlay in Warzone:
- Open GeForce Experience
- Go to the Settings menu.
- Turn on the in-game overlay.
- Launch Warzone
- Use the Alt+Z keyboard shortcut to activate the GeForce Experience overlay.
Related: RTX 3080 Ti vs RX 6900 XT: Detailed Comparison
Nvidia Shadowplay
Nvidia Shadowplay is still the more well-known feature, although Share and Shadowplay are practically the same software. Shadowplay is only a little different moniker.
Now that it’s been taken care of, it’s time to start recording some games! Follow the steps below to use Nvidia Shadowplay for recording, broadcasting, and other purposes.
Step 1: Open GeForce Experience
To begin the GeForce Experience installation process, click the Windows icon on your computer’s taskbar. To launch the program, you must go to the “Start” menu and type “GeForce Experience.”
Step 2: GeForce Experience Optimisation
GeForce Experience may need some tweaking and a look at its settings before you can use Nvidia Share if you haven’t used it.
To begin, allow the software to automatically update itself, after which it should download and set up any updated drivers. When that is finished, you may access Settings by clicking the tiny gear icon in the upper right corner of the screen.
To use the in-game overlay:
- Scroll down until you reach the Features area and click on it.
- Verify that your device can run Nvidia Shadowplay by running the compatibility check.
- If this is the case, go to the left side of the screen to activate the In-Game Overlay.
Step 3: Adjust Your Settings
Before you record, you can customize a few settings by clicking the Settings button, which is located directly underneath the toggle switch for the in-game overlay.
The Privacy Control and Recordings settings are the two most important ones that you have to adjust before recording:
- To activate Desktop Capture, you must first locate it by scrolling to the bottom of the Settings menu, where it will be listed under Privacy Control. You won’t have any recording capabilities if you don’t have this.
- You can select the folder that will become home to all of your video recordings within Recordings. Check it out before starting the recording, particularly if you have little space available on one of your disks.
The following is a list of some other helpful things that you can perform in this section:
- Keyboard shortcuts: You may customize the in-game keyboard shortcut that activates Nvidia Shadowplay and some other useful functions right from the comfort of your keyboard.
- Video capture: This area allows you to customize the Instant Replay feature’s video quality, resolution, frames-per-second (fps), and recording length.
- Audio: You can isolate and silence individual audio channels inside this section. If you plan to play a game while still communicating verbally with others, it will be handy to have this.
Additionally, there are many distinct configurations from which to choose. You are welcome to navigate the site at your leisure and check out the many areas.
If you try to alter some settings and find that you can’t, the reason is probably that Instant Replay is now active on your system. To disable it, go to the Settings menu, click the Done button, and turn off the option using the toggle switch.
Step 4: Launch Nvidia Shadowplay
Open the program or game you want to record before continuing with the steps. Check to see if your GeForce Experience is also open, or at the very least, that it is running as a background process.
Access Nvidia Shadowplay by clicking the little Share symbol in the upper-right corner of GeForce Experience, directly next to the Settings cog and your profile. You can access the in-game overlay by clicking the Share button. Even if you aren’t playing a game now, you can bring up this overlay whenever you like.
You can also use the shortcut on your keyboard to launch Nvidia Shadowplay by pressing the Alt + Z combination if GeForce Experience is already open on your computer. It is important to remember that it is the default shortcut key; if you changed it in the step before this one, it might not work.
Related: Top 5 Gaming Laptops with Best GPUs
How to Disable Nvidia Overlay
To disable the Nvidia GeForce overlay, repeat the following steps:
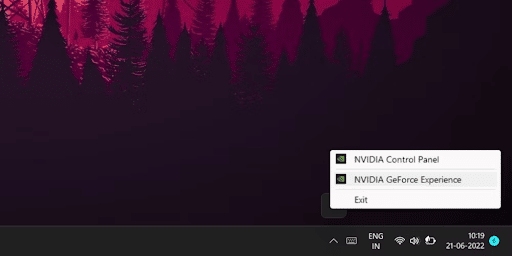
- Navigate to your desktop and move the pointer of your mouse to the taskbar. The concealed icons can be seen by clicking the arrow icon.
- Pick the Nvidia GeForce Experience from the drop-down menu that appears after you right-click on the Nvidia symbol.
- Launch the GeForce experience
- To access the configuration menu in Nvidia GeForce Experience, use the gear symbol in the app’s navigation bar.
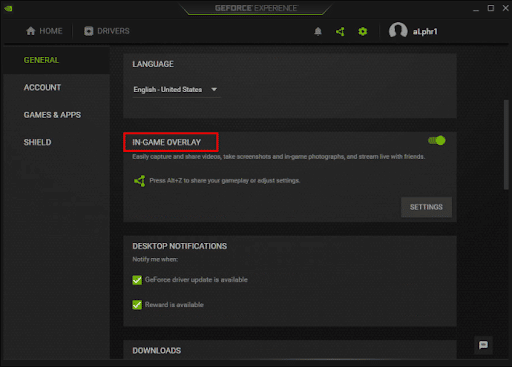
- Now, scroll down until you find the ” In-Game Overlay option.” If there is a green switch next to it, that shows that the overlay is now being used.
- Turn off the overlay option.
- You must click on the green toggle to turn off the In-Game Overlay for your system.
- Last, exit Nvidia GeForce Experience. After this, the overlay won’t be visible. You may validate it by hitting the Alt + Z shortcut, which is the standard operation for the overlay.
Related: What Is SLI And Is It Worth It? (Simple Answer!)
Conclusion:
The Nvidia Overlay is easy to use. It is a straightforward tool that allows you to monitor your game performance and customize your gaming experience. You can access the Nvidia Overlay by pressing the Alt+Z key combination while in-game. You can view your game performance, take screenshots, and record gameplay footage. You can also customize your game settings, such as audio volume and graphic quality. Overall, the Nvidia Overlay is a valuable tool for any PC gamer.


