


Image by Which
Printers are an essential part of any office or home; they work by receiving text or images from a computer and printing them onto paper. Changing the ink cartridges in your HP printer improves the quality of printed documents and the machine’s longevity.
Therefore, poor-quality prints and low-ink warning messages are indications that it is time to replace your ink cartridge. Before changing the ink cartridge, ensure you have the correct replacement cartridge for your specific HP printer model.
This article provides a step-by-step tutorial on how to change ink in HP printer. Are you ready? Let’s get started with the tips to help you select the correct cartridge for your printer.
Table Of Contents
- 1 How Do You Know the Right Time to Change the Ink Cartridges
- 2 Types of Ink Cartridges That HP Printers Use
- 3 How to Change Ink Cartridges in an HP Printer: Step-by-Step Guide
- 4 Common Issues That May Arise During the Ink-Changing Process
- 5 Tips for Maintaining Printer Ink: 5 Useful Hacks
- 6 How to Change Ink in HP Printers: FAQs
- 7 Conclusion
Key Takeaways
- Changing the ink cartridges improves the quality of printed documents and the printer’s longevity.
- Poor-quality prints and low-ink warning messages are indications that it’s time to replace ink cartridges.
- Issues, sometimes, still occur, even when the ink cartridge has been replaced.
How Do You Know the Right Time to Change the Ink Cartridges
As ink cartridges eventually run out, it’s essential to know when they need replacement. Every printer is different, but most will give a warning by having a “toner low” or “ink low” light flash. Alternatively, you can also notice that the quality of the print looks faded.
To check ink levels on an HP printer, turn on the printer as you locate and open the cartridge access door, which is usually on the right edge of the printer. Press down on the old cartridges to release them from the carriage.
A managed print partner ensures that you don’t run out of ink too soon. The managed print services auto-replenish toner when supplies read 10% via the data collection agent, and you’ll receive an alert to change your toner.
However, if you’re paying out-of-pocket for your toner cartridge, it’s best to inspect recently printed pages visually. If the printouts are consistently too light, the cartridge has reached its end, even if it has more ink left.
Keep in mind that toner quality diminishes while on the shelf. Therefore, avoid using a toner set that has been in storage for six months or more. It increases the likelihood of ink running dry early.
Related: How to Bypass HP Printer Cartridge Error
Types of Ink Cartridges That HP Printers Use
Some HP printers use only two cartridges, one black and the other tri-color. However, you will also find HP printers which have four individual cartridges that come in black, cyan, magenta, and yellow. Both types of ink cartridges produce high-quality prints, but individual ink cartridges are cost-effective.
The black and tri-color ink cartridge is the oldest combination with an integrated printhead. They work with inexpensive Inkjet printers, making them a popular choice for individuals who want to save a significant amount on printing.
The famous black and tri-color ink cartridge series include HP67, HP65, HP64, HP60, HP62, HP 61, and HP 63. Even though these different cartridge series look identical, they are not interchangeable.
When purchasing replacement ink cartridges, pay close attention to the page yield of the cartridges that work with your printer. HP 62 or HP 64 cartridges offer the most amount of ink. Additionally, you may need additional supplies, such as cotton swabs, distilled water, and a lint-free cloth for the ink-changing process.
Related: How to Print From iPad to HP Printer
How to Change Ink Cartridges in an HP Printer: Step-by-Step Guide
Changing the ink cartridges in your HP printer is a simple process you can complete in just a few minutes. Let’s walk through the step-by-step process of changing the ink cartridges in an HP printer.
Step 1: Power on Your Printer
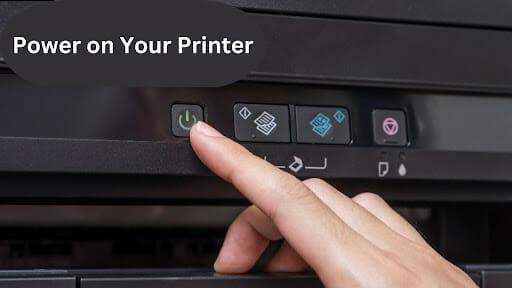
Before replacing the ink, turn on the printer to automatically identify an open cartridge door and stop all the movable parts.
Step 2: Lift the Ink Cartridge Access Door
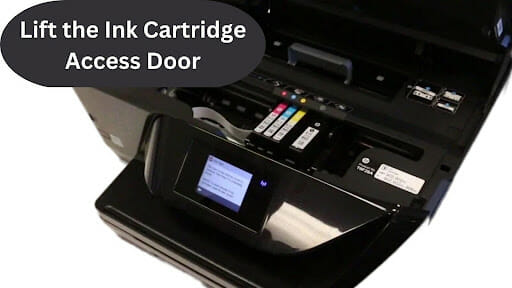
Find the display’s lid and access door for the ink cartridges. After the printer has stopped moving, raise the access panel for the ink cartridges.
Step 3: Remove the Old Ink Cartridge(s)
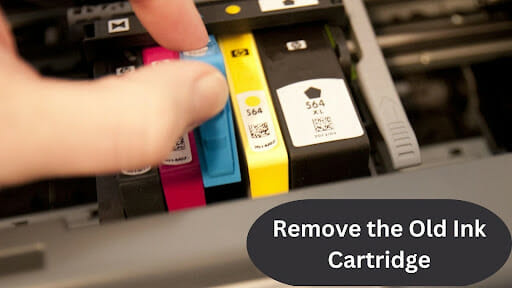
Lift the plastic cover keeping the old ink cartridge(s) in place, and then carefully remove the cartridge from the slot. If you’re changing the colored and black ink cartridges, remove both of them.
To prevent staining yourself, avoid touching the ink nozzles. Additionally, note that dots on the cartridge show the ink’s color. Therefore, a black dot indicates that the ink inside the cartridge is black.
Step 4: Unpack the New Ink Cartridge(s)
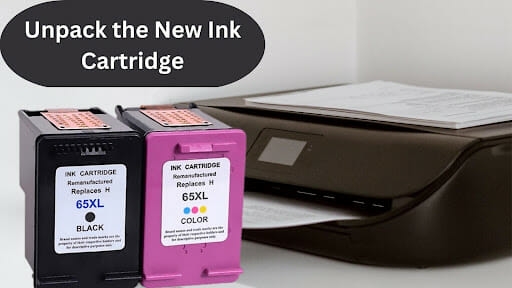
Remove the new ink cartridge(s) from its packaging, and be sure only to touch the black plastic part of the cartridge.
Step 5: Install the New Ink Cartridge(s)
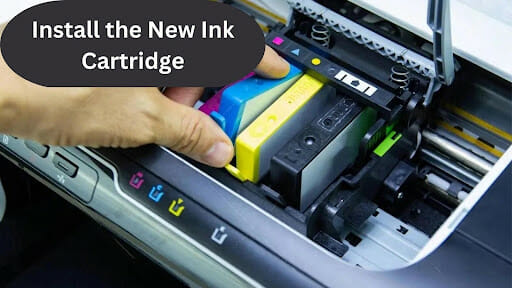
Hold the new cartridge(s) by its sides and remove the orange sticker. Avoid touching the copper contacts underneath. Insert the cartridge(s) in their appropriate slots. You’ll see the light purple lid on the left for the tri-colored cartridge and a black lid to the right for the black cartridge. Ensure the ink nozzle faces the back of the printer, and gently snap the cartridge(s) into place. If you need to, you can lift the colored lid to insert the cartridge, but close it again when you finish.
Step 6: Close the Ink Cartridge Access Door
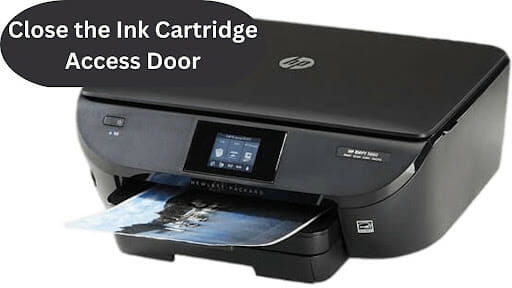
Close the access door as in the first step. The process should be smooth and slow to avoid breaking the cover or even displacing the printer’s components.
Step 7: Confirm the Ink Cartridge Replacement
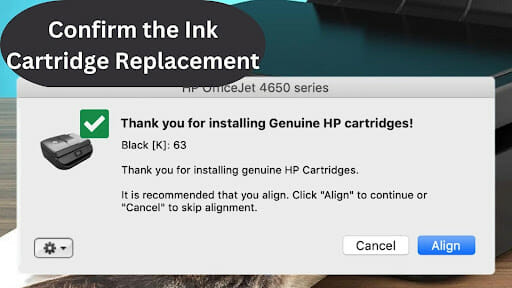
Click on the “OK” button from the printer’s control panel. That will prompt the printer to automatically detect the replaced ink cartridges. Therefore, the prompt is meant to help you confirm the changes.
After confirming the change of ink cartridge, the printer will automatically print an alignment page to complete the process. You need to load some papers if your printer has none.
Related: How to Make Generic Ink Cartridges Work on an HP Printer?
Common Issues That May Arise During the Ink-Changing Process
Here are the most common problems that may arise during the ink-changing process and their solutions:
The Printer Is Not Printing When the Ink Is Full
If the printer isn’t working even after changing the ink, the problem could be a faulty printer or ink cartridges. Here are some simple checks you can do to fix this issue:
- Check that the printer is appropriately plugged into a power source.
- Connect the printer correctly to the computer.
- Check for correct media and the availability of paper in the input tray.
- Address error signal.
- Make the print head free from ink clogs.
The Printer Is Not Printing After Changing the Cartridges
If the printer is not working even after completing the above steps, the issue may be on ink cartridges. Here are some solutions:
- Take out the protective taping from the cartridges.
- Bypass the ink-checking system through a quick cartridge reset.
- Do an extended cleaning cycle of the ink cartridge.
Related: How to Change Ink in Canon Printer
Tips for Maintaining Printer Ink: 5 Useful Hacks
Printer ink cartridges are expensive, so ensuring they are used to the last drop is essential. Unfortunately, a lot of ink inside the cartridge goes to waste, leading to unexpected ink tank depletion, clogged nozzles, and improper cartridge storage. Use the following five tips to maintain printer ink:
Tip 1: Use the Printer Once a Week
Using your printer at least once weekly keeps everything open and flowing, reducing ink build-up and clogged nozzles. It is a form of ink cartridge maintenance.
Tip 2: Store Ink Cartridges Properly
It’s best to store extra cartridges upright and somewhere safe, dark, and dry. Storing them sideways or upside down can lead to ink waste and potential print quality problems.
Tip 3: Configure the Room Temperature
Maintain a standard room temperature, to stop cartridges from drying out. A pleasant 68 degrees Fahrenheit should help preserve your ink cartridges.
Tip 4: Keep Cartridges Sealed at All Times
Open cartridges dry out easily, leading to poor print quality. It is best to pop its seal open during use only. A cartridge without a seal should be stored in a sealed plastic tub with a clean, damp cloth or paper towel inside.
Tip 5: Moisten Ink Cartridges
Moistening the cartridges occasionally prevents printer ink from drying out. Clean the cartridge’s top surface with a clean, damp cloth or paper towel to prevent clogging. In addition, wipe off excess moisture using a dry lint-free cloth.
Related: Why Is Your HP Printer Not Connecting to Wi-Fi?
How to Change Ink in HP Printers: FAQs
How to You Change Ink in Hp Printer 4100
To change the ink in an HP printer 4100, follow the steps below:
- Turn on the printer.
- Open the ink cartridge access door.
- Remove the old ink cartridge and replace it with the new one.
- Close the ink cartridge access door.
How to Reactivate / Fix Dried Cartridges
Effective ways to reactivate or fix dried cartridges include unblocking clogged nozzles and removing obstructions to enable ink to flow freely.
How to Change Ink in Hp Printer 3830
To change the ink in an HP printer 3830, follow the steps below:
- Press the printer’s power button
- Open the ink cartridge access door.
- Press down on the ink cartridge you’d like to replace, then release it
- Remove the old cartridge
- Unpack the new ink cartridge
- Remove the protective tape
- Insert the new ink cartridge into the correct slot.
- Close the ink cartridge access door.
How to Put Ink in Hp Printer Deskjet 2700
To put ink in an HP printer Deskjet 2700, follow the steps below:
- Turn on the printer.
- Lift the scanner lid
- Press down on the old ink cartridge to release it
- Remove the cartridge
- Unpack the new ink cartridge and remove the protective tape.
- Insert the new ink cartridge into the correct slot.
- Lower the scanner lid.
How to Put Ink in an HP Printer Deskjet 2710
To put ink in an HP printer Deskjet 2710, follow the steps below:
- Power on the printer
- Lift the scanner lid to access the ink cartridge carriage
- Press and hold down the old ink cartridge to release it, then remove it
- Remove the new cartridge from the box
- Remove the protective tape
- Insert the new ink cartridge into the correct slot
- Close your scanner lid
How Do I Change My Ink?
To change your ink, follow these general steps:
- Turn on the printer.
- Open the ink cartridge access door.
- Press down on the old ink cartridge to release it, and then remove it.
- Unpack the new ink cartridge from its packaging
- Remove the protective tape.
- Insert the new ink cartridge into the correct slot.
- Close the ink cartridge access door.
Related: Where Is the IP Address on a Printer?
Conclusion
Changing ink cartridges in an HP printer is an essential process that all printer owners must know. The process may vary depending on the printer model but is relatively straightforward. The first step is to ensure that you have the correct ink or toner cartridge for your printer.
Handle the cartridge carefully to avoid damaging it, and follow the color patterns when installing the new ink cartridges. Checking ink levels regularly will help you know when to replace your ink cartridge. Overall, changing ink cartridges in your HP printer ensures high-quality work and prevents printer damage.
Sources: