


Changing the refresh rate of your monitor can help improve the quality of your visual experience, especially when watching videos or playing games. Here are the steps to change the refresh rate of your monitor:
- Right-click on your desktop and select “Display settings” or “Screen resolution” from the menu that appears.
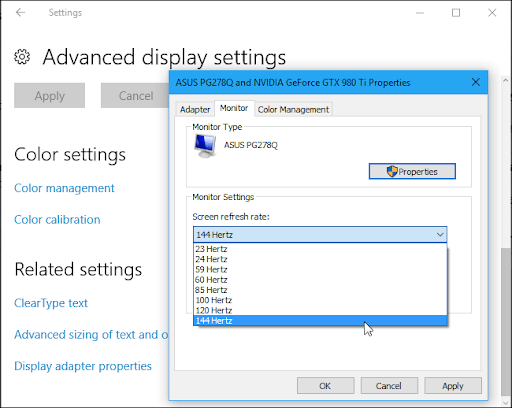
- In the display settings window, scroll down to the bottom and click on “Advanced display settings.”
- Under the “Advanced display settings” menu, click on “Display adapter properties” or “Display adapter properties for Display #” (where “#” is the number of your display).
- In the display adapter properties window, click on the “Monitor” tab.
- In the “Monitor” tab, you should see a drop-down menu labeled “Screen refresh rate.” Click on the drop-down menu and select the desired refresh rate.
- If the desired refresh rate is not available in the drop-down menu, you may need to first enable it by clicking on the “List all modes” button.
- Once you have selected the desired refresh rate, click on “Apply” and then “OK” to save the changes.
Note that not all monitors support all refresh rates, so it is important to check your monitor’s specifications before attempting to change the refresh rate. Additionally, higher refresh rates may require more processing power and may not be suitable for all applications or systems.
Table Of Contents
How do I change my Monitor to 144Hz?
A display that won’t operate at 144Hz might be annoying for high-performance and PC gamers. A 144-hertz monitor refreshes the display 144 times per second to provide new pictures on high-resolution screens.
Anyone with a computer problem knows how frustrating it is to have a monitor that isn’t working correctly. It might manifest in sluggish action or a glitchy display on screens with a high refresh rate. Follow these troubleshooting procedures if you’re having these problems;
- Check whether you have a 144Hz-capable display hooked into the display or DVI-D connector if your monitor isn’t operating correctly. Most 144Hz displays will automatically connect to Windows computers at that resolution. Other connections will not support 144Hz rendering.
- To access display information, go to the computer’s settings. Go to Start, then Settings, then System on your Windows PC.
After that, go to Display > Advanced Display Settings. Then you’ll want to look at the Refresh rate (Hz).
It will display information about your computer and monitor’s display, such as the desktop resolution, active signal resolution, and refresh rate (or hertz). You may modify your refresh rate here if it is not set to 144Hz.
The Monitor tab may be found under Display Adapter Properties.
Select the 144 Hertz refresh rate from the drop-down option and click OK.
- Check the graphics driver on your computer if your display still won’t run at 144Hz. Out-of-date drivers frequently cause monitor problems.
Updating drivers can help maintain your computer and display in good working order. Manually downloading and installing a driver to match specific computer hardware might be time-consuming. First, you must identify your graphics card and match the driver to your operating system.
Related: 8 of The Cheapest 240HZ Monitors on The Market in 2023
Why is my 144Hz Monitor capped at 60Hz?
One typical problem is that your display may be set at 60 Hz by default.
Go to Settings > System > Display > Advanced Display Settings > Display Adapter Properties to make the necessary changes. Then, under “Monitor,” select the refresh rate of your monitor from the drop-down option.
You can choose between the several refresh rates that your monitor supports. If your display supports 144 Hz, you should be able to view it if you insert your HDMI 2.0 cable into the relevant ports.
Another reason might be the connection that restricts the monitor’s capacity to operate at more than 60Hz. Using the improper cable may result in your 144Hz display only showing 60Hz. To modify this, you’ll need at the very least a 144Hz-compatible connection, such as HDMI 2.0.
If your display is 144Hz, but only 60Hz appears on your screen, another typical issue is that your console may not support 144Hz.
How to Change Monitor Refresh Rate Windows 10?
Use these methods to adjust the correct refresh rate if you’re having display problems due to the refresh rate configuration in Windows 10:
- Go to Settings >
- System >
- Display >
- Advanced Display Settings >
- For Display 1, click the Display adapter properties link. Quick Tip: In addition to resolution, bit depth, and color format, you can view the current refresh rate on your monitor on this page.
- Select the Monitor option.
- Use the drop-down option under “Monitor Settings” to choose the refresh rate you want.
- Then press the Apply button.
- And select the OK option.
After you’ve finished the instructions, the display should automatically switch to the new refresh rate you’ve set.
Your device’s display, graphics adapter, and resolution will always determine the speeds you can choose.
If your monitor supports a faster refresh rate but doesn’t see the choice, make sure you have installed the most recent graphics driver. You can also try lowering the resolution since many monitors can handle a faster refresh rate but at a lower resolution.
How to Change Refresh Rate on Monitor Windows 11?
To adjust the proper refresh rate on your Windows 11 device, follow these instructions:
- Open settings.
- Select System.
- On the right, click the Display page.
- Select the Advanced display setting from the “Related settings” section.
- Choose an optional refresh rate using the “Choose a refresh rate” setting under the “Display information” section.
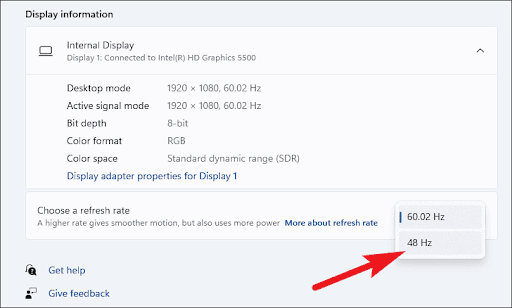
After you have finished the procedures, the system will apply the new setting, and the display will begin to use the new refresh rate.
Can’t Change Monitor Refresh Rate Windows 10
When you modify the refresh rate of your display, most flicker, smoothness, and frame tearing issues disappear. However, understanding how to alter the refresh rate (Hz) on your display settings may not be enough to solve the problem. You’ll need to perform some troubleshooting in this scenario.
Even if your monitor supports it, you may not be able to find the maximum Hertz option in the drop-down menu. You may be experiencing a hardware issue in this situation. Check to determine if your display cable can handle the bandwidth for the high refresh rate, especially if you’re using a 4K monitor.
Your graphics card may occasionally cause refresh rate troubles. Upgrade your drivers to the most recent version and see if it fixes the issue. If not, ensure your graphics card matches your display’s refresh rate.
On the software side, you may also attempt some troubleshooting methods. To avoid scaling artifacts and latency, it’s recommended to output video resolution that matches your monitor’s native resolution. It saves bandwidth to help maintain the maximum refresh rate on the Windows and/or GPU app display settings.
How to Increase Refresh Rate on Monitor?
To get started, go to Start > Settings. Go to System > Display once the Settings window is open. Then scroll down to the Multiple Displays section and choose the “Advanced display settings” option.
If you have a multi-monitor configuration, ensure the drop-down list shows the right display on the following screen. Then, choose the Display adapter settings for the Display 1 connection towards the bottom. (Depending on your arrangement, this might also be Display 2 or Display 3.)
A utility window with three tabs appears when you click on the link—select Monitor and select Screen refresh rate from the drop-down box in the “Monitor Settings” section. Choose your monitor’s maximum refresh rate. You’ll probably need to replace the display cables if you don’t see the maximum rate.
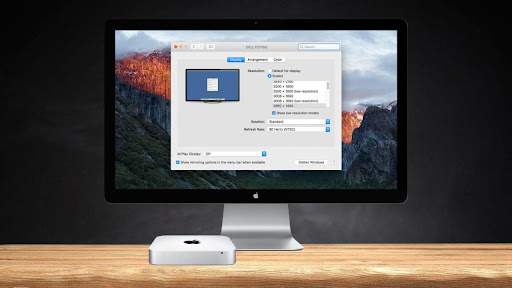
How to Change Refresh Rate on Monitor Mac?
For the latest MacBook Pro 16″ and newer models, and the Apple Pro XDR display, you can adjust the Mac refresh rate as follows:
Select ‘System Preferences’ from the Apple menu at the bottom of the screen.
Navigate to “Displays.”
Hold down the OPTION key and select the “Scaled” button under the “Display” tab to view the “Refresh Rate” choices.
For most screens, the default setting is 60 hertz, which is suggested to keep.

External screens may also modify their refresh rate; here’s how to accomplish it:
If it isn’t connected, attach the external monitor to the Mac.
Select ‘System Preferences’ from the Apple menu at the bottom of the screen.
Navigate to “Displays.”
Hold down the OPTION key and select the “Scaled” button under the “Display” tab to show the “Refresh Rate” settings for that display.
You need to connect the monitor to the Mac in the same steps mentioned.
CONCLUSION
It’s critical to understand monitor refresh rate and how to alter it, whether you’re utilizing an old monitor or attaching a new buy. Connecting a monitor to your desktop computer usually uses the maximum refresh rate that your display can handle. This, however, does not always occur. If your 144 Hz gaming monitor isn’t as smooth as you’d like, it may run on a lower refresh rate, which you’ll need to set manually.
Hopefully, through our article, “How to Change Monitor Refresh Rate? – A Complete Guide” you must have got a brief idea about how to alter the refresh rate on a monitor (or how to change the Hz on a display) and other troubleshooting advice for monitor refresh rate difficulties.