


Hooking up a laptop to an external display is standard practice at the office and at home. But using a laptop as your second display is less common, even though it’s simple to set up.
Having a laptop as your second display can offer all the usual benefits of working with two screens: more space for your programs, multitasking convenience, and the ability to simultaneously open more tabs and windows. Enjoying your Xbox or PlayStation games on your computer screen is also possible.
Fortunately, connecting your laptop as a secondary display is straightforward, with only a few requirements. The two must run the same operating system when connecting to another computer. You also need the proper hardware and software tools for the job.
Related: How to Close a Laptop and Use the Monitor? Follow These Steps
Table Of Contents
Key Takeaways
Here’s how to use a laptop as a monitor with HDMI:
- Insert the cable into the first laptop’s port
- Connect its other end to your display laptop
- Press the Windows button and P concurrently
- A control panel will appear on your first laptop’s right-hand side. Click on extend or duplicate, depending on how you intend to use it.
This detailed article will guide you on how to use a laptop as a monitor for another laptop via HDMI and USB-C cable and for gaming consoles.
Related: What is the Best Monitor for Office Work?
Use a Laptop as a Monitor With HDMI and Windows 10
Microsoft created a relatively simple process of connecting two laptops. Here are the steps:
- Open Settings on the device you intend to use as your second screen.
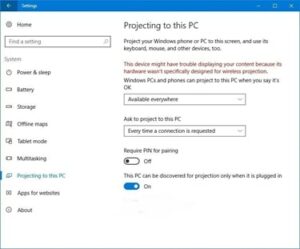
- Select “System,” and then click “Projecting this PC.”

- Hit the Windows key and P simultaneously on your primary device, then select “Connect to a Wireless Display” in the lower section. You should turn on your Wi-Fi.
- Select “Extend”
- You’ll again click on “Connect to a Wireless Display” and select the second laptop’s name once it appears.
You’ll have linked the two displays with these steps, and your cursor and files should quickly move between the screens.
How to Use a Laptop as a Monitor With Windows 11
Using your laptop as a monitor with Windows 11 doesn’t differ much from the previous process. Here’s how to do it:
- Opens Settings in the device you consider your second screen, then select the “Apps” option on the left pane.
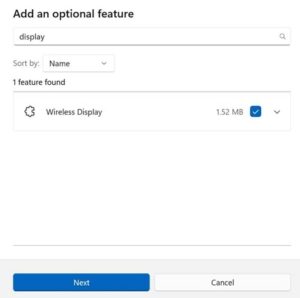
- Choose “Optional features.”
- Hit the blue ‘View features’ button
- Type ‘display’ in the search bar, mark the ‘Wireless Display’ box, and hit ‘Next’

- Select “install,” then wait for a few seconds
- Choose “System,” scroll down, and click “Projecting this PC.”
- Choose your preferred settings while balancing accessibility and security.
- Click on Windows + P on your primary device, then select your preferred projection option.
- Pick the secondary device, and link the two laptops
Since it’s a wireless connection, the experience won’t be the same as connecting to a second screen using a cable. However, it can come through for you when you’re stuck and need a quick solution.
How to Use a Laptop as a Monitor With USB-C
You aren’t only limited to an HDMI cable to use your laptop as a secondary monitor. The USB-C cable can also come in handy. Here’s how to use it:
- Connect the cable to your primary device
- Connect the other end to the laptop you intend to use as a display
- Press the Windows key and type “Display” in the search box
- Select the “Duplicate or extend to a connected display” option
- Hit “Duplicate these displays.”
- Select “Keep Changes”
Using a Laptop as a Display for Your Games Consoles
Game enthusiasts can enjoy their passion from their laptop screens instead of searching for a TV. While some gamers are aware of this possibility, most still ask, “can you use a laptop as a monitor with HDMI?”
Yes, you can use HDMI to link your console and laptop, but you cannot play directly.
Instead, you’ll use the following methods for PlayStation and Xbox consoles:
How to Use a Laptop as a Monitor for PS4
PlayStation consoles have the Sony Remote Play feature, enabling remote connection for smooth streaming to your laptop. This setup requires a USB cable or wireless Dualshock-4 USB adaptor, a high-speed internet connection, and a PlayStation account.
Begin by arranging the liquid crystal display since you’ll use some console settings, then follow these steps:
- Download and install a compatible Remote Play app on your laptop
- Authorize a Remote Play connection in the settings
- Connect your gaming controller via USB. Then turn on the Remote Play app on your laptop.
- Choose your preferred connection settings in the app, then select an ideal screen resolution.
- Plug in your wireless USB adapter, and a Start button will appear on the app. This button will take you to the login screen, where the app automatically picks the console.
That’s it! You’re now set to enjoy your PlayStation games on your laptop screen.
Related: How to connect PS4 Controller Without USB
How to Use a Laptop as a Monitor for PS5
Follow these steps to enjoy your PS5 games from the laptop screen:
- Plug your USB-C cable into the output port of your Elgato capture card
- Connect the other end to the USB 3 port
- Plug the HDMI into the card’s input port and the other end into your PS5 HDMI output port
- Select your capture card preferences on the alert window, and you’re done!
How to Use a Laptop as a Monitor for Xbox

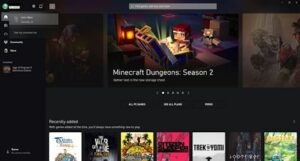
You must first install the Xbox app on your laptop before you use it as your gaming display. After installation, you’ll sign in using your Microsoft account details, then hit the Consoles button in your Xbox app, usually at the screen’s top-right corner. You’ll then choose your Xbox to connect it to the laptop.
The app will load briefly before the startup screen, where you can interact with your device as you would normally.
You won’t use your keyboard and mouse. But you can access helpful options when you click on the three-button menu, including:
- Send Feedback
- Mute, Disconnect
- Toggle Full Screen
After connecting using the above steps, your console will turn on remotely.
Using a macOS Laptop as a Display for Your macOS Desktop
Like windows 11, macOS devices leverage the wireless streaming protocol. In this case, you’ll leverage the AirPlay display, which lets you use your MacBook as a display for Apple tablets, desktops, and other laptops. You can connect via USB or Wi-Fi, but the primary requirement is that both devices must run macOS Monterey or a later operating system.
The AirPlay Display option is accessible via the Control Center on the right section of the menu bar. After opening it, you’ll choose Screen Mirroring, then connect to another compatible Mac on the same network.
Related: Best Ultrawide Monitor for MacBook Pro
Next, you’ll open the System Preferences, then Display Settings. Once done, you should easily drag windows between the two screens, although your Wi-Fi connection can cause a slight lag.
Lastly, you’ll open the device’s Control Center and select Screen Mirroring, which allows you to mirror and extend the displays. You can break the connection by clicking your MacBook Pro’s name in the Control Center.
You now know the different methods of using your laptop as a secondary screen for another laptop, desktop, or gaming console.