


If you’re a homeowner, electrician, or just someone who likes to do home improvement projects, learning how to wire a GFCI outlet is a valuable skill. GFCI outlets are required by code in many areas and can offer life-saving protection against electrical shocks. This comprehensive guide has step-by-step instructions and diagrams for wiring a GFCI outlet. With this knowledge, you’ll be able to tackle your next home improvement project confidently.
Key Takeaways
- A GFCI, or ground fault circuit interrupter, is an electrical outlet to prevent shocks. It disconnects the power if the imbalance is detected.
- Attach black and white wires to the “line” side of an existing grounded power outlet to install a new ground-fault circuit interrupter outlet. The bare wire should be attached to the grounding screw. After changing the cover plate, verify that the GFCI is functioning correctly. Once the test button is pressed, the outlet should go out.
Let’s get started.
Table Of Contents
- 1 What Is A GFCI Outlet?
- 2 How GFCI Outlet Works
- 3 How Many Wires Does A GFCI Outlet Have?
- 4 Can I Install A GFCI Outlet Myself?
- 5 How To Wire GFCI Outlet With 2 Wires
- 6 How To Wire GFCI Outlet With
- 7 How To Wire A GFCI Outlet With 3 Wires
- 8 Testing Your Newly Wired GFCI Outlet
- 9 Tips For Troubleshooting your GFCI Outlet
- 10 GFCI Outlet Wiring Line Vs. Load
- 11 The Bottom Line
What Is A GFCI Outlet?
A GFCI, or ground fault circuit interrupter, is an electrical outlet to prevent shocks. It disconnects the power if an imbalance is detected.
Therefore, GFCI is a protective device against electrocution. Shock occurs when there is a difference in the electrical potential between two points, for example, when your finger comes in contact with a live wire.
GFCI outlets are required in areas with a risk of contact with water, such as bathrooms and kitchens. They can also be used outdoors to protect against shocks from wet weather.
Related: Best Solar Generator For Home Backup – 6 Options for 2023
How GFCI Outlet Works
While GFCI outlets offer an essential layer of protection, they should not be relied upon as the sole means of preventing shocks.
GFCI outlets work by constantly monitoring the electricity flowing through the wires connected to them. If they detect any imbalances, they will immediately shut off the power. The safety feature is helpful in homes with young children or elderly residents.
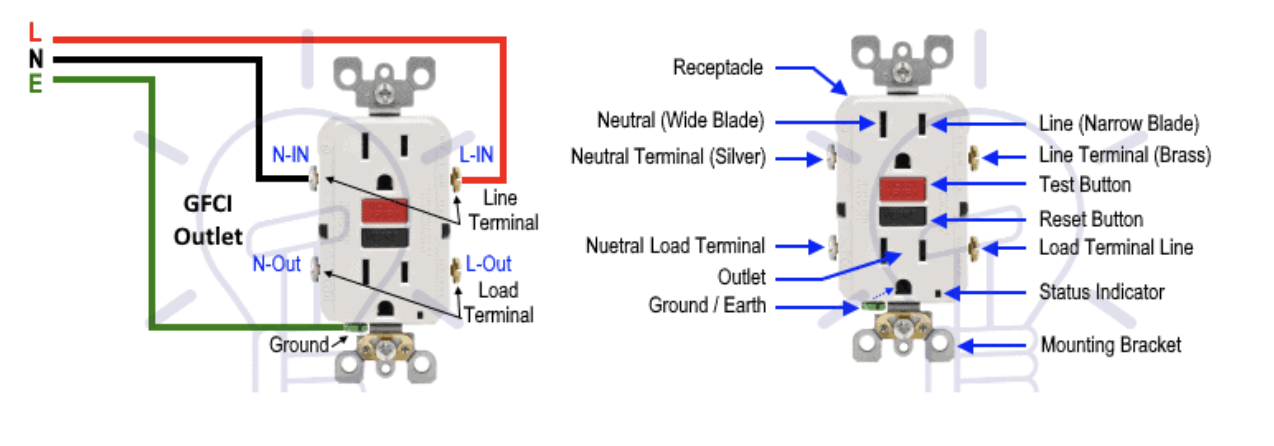
How Many Wires Does A GFCI Outlet Have?
Most GFCI outlets have two sets of terminals: The LINE terminals, which are used to connect the outlet to the primary source of power, and the LOAD terminals, which are used to connect the outlet to other devices downstream from it.
In a standard outlet, these two sets of terminals are always powered. However, in a GFCI outlet, only the LINE terminals are always powered; the LOAD terminals are only powered when the reset button on the outlet is depressed.
There are other GFCI outlets with 3 or 4 wires. For a GFCI outlet with four wires: two black wires (the “hot” wires), a white wire (the “neutral” wire), and a green wire (the “ground” wire). The black wires are connected to the LINE terminals, the white wire is connected to the LOAD terminal, and the green wire is connected to both terminals.
Related: Outlet Height From Floor – A Detailed Guide
Can I Install A GFCI Outlet Myself?
Yes, you can install a GFCI outlet yourself. However, there are a few things you need to know before you get started.
First, GFCI outlets must be installed in areas with potential shocks, such as near water sources or damp areas. Additionally, GFCI outlets need to be wired appropriately to work correctly.
Test your GFCI outlets regularly to ensure they are working correctly. Hiring a professional electrician is brilliant if you are not comfortable wiring the GFCI outlet or are unsure how to test its functionality.
GFCI outlets are coded in many areas, and as a result, they are often installed by electricians. However, a homeowner can install a GFCI outlet themselves. The process involves connecting the new outlet to the existing wiring and attaching it to the wall.
While it’s possible to do this yourself, exercising caution is essential. Incorrectly wired GFCIs can pose a severe fire hazard, so unless you are confident in your abilities, it is best to leave this job to a professional.
Related: What are RH and RC on Thermostats? (Simple Answer!)
How To Wire GFCI Outlet With 2 Wires
Tools and Materials Needed:
- Wire strippers
- Screwdriver
- Needle nose pliers
- GFCI outlet
- 2-wire Romex cable
- Phillips head screws
- Standard outlet cover plate
-
Step 1
You first need to turn off the power to the circuit you will be working on at the breaker box. Use a screwdriver to remove the faceplate from the old outlet. Then use wire strippers or needle nose pliers to remove about ½ inch of sheathing from the Romex cable.
Twist the bare copper wires clockwise and secure them with a wire nut. Don’t over-tighten the wire nut, or it may come loose and cause sparks or an electrical fire. Repeat this step for the black and white wires, twisting each set of wires together separately.
-
Step 2
With the wires twisted together and secured with wire nuts, insert them into the side terminals of the GFCI outlet. The black wires go on the brass screws, and the white wires go on the silver screws.
If there is a green grounding wire, it will go on the green grounding screw. Once all the cables are inserted into their respective terminals, use a Phillips head screwdriver to tighten each screw until it is snug but not too tight. Too much tightening of screws can strip them and make screws challenging to remove later.
-
Step 3
To finish up, replace the faceplate on the GFCI outlet and restore power to the circuit from the breaker box.
-
Step 4
Test your new GFCI outlet by plugging in a lamp or small appliance and pressing the “test” button.
The power should shut off when you press the test button—if it doesn’t, there may be something wrong with your wiring, and you should call an electrician immediately.
How To Wire GFCI Outlet With
Here is how to install GFCI outlet with 4 wires;
-
Step 1
Turn off the pow4 Wire Ser to the circuit you’ll be working on at the breaker box.
-
Step 2
Remove the cover plate from the existing outlet and unscrew the outlet from the electrical box.
-
Step 3
Disconnect the black (hot), white (neutral), and ground wire from the existing outlet. These will be connected to the new GFCI outlet.
-
Step 4
Connect the black (hot) wire to the brass screw terminal labeled “LINE,” the white (neutral) wire to the silver screw terminal labeled “LINE,” and the ground wire to the green screw terminal labeled “GROUND.”
-
Step 5
Finally, screw the new GFCI outlet into place and replace the cover plate. Turn on the power at the breaker box and test that everything is working correctly by pressing the reset button on the GFCI outlet.
Related: Which Type of Heater Is Cheapest to Run?
How To Wire A GFCI Outlet With 3 Wires
While they are more expensive than a traditional outlet, the GFCI outlet with three wires provides an extra level of safety that is worth the investment. Here are the instructions for installing a GFCI outlet with three wires.
-
Step 1
Turn off the power to the circuit that you will be working on. You can do so by flipping the switch at the circuit breaker box.
-
Step 2
Remove the cover plate from the existing outlet. You will need to use a screwdriver to remove the screws holding the plate in place.
-
Step 3
Once the cover plate has been removed, you should see three black, white, and copper (ground) wires.
-
Step 4
Using a wire stripper, strip about ½ inch of insulation from each of the three wires.
-
Step 5
Take the black wire and attach it to the brass screw on the side of the outlet marked “BLACK” or “HOT.”
-
Step 6
Attach the white wire to the silver screw on the side of the outlet marked “WHITE” or “NEUTRAL.”
-
Step 7
Finally, take the ground wire and attach it to the green screw on the side of the outlet marked “GROUND” or “GRD.”
-
Step 8
Once all three wires have been securely attached, replace the cover plate and flip back on the power to your circuit breaker box. You should now have power to your newly installed GFCI outlet.
Testing Your Newly Wired GFCI Outlet
Whether you’re a professional electrician or a DIY homeowner, test your work to ensure it’s safe and up to code. The most crucial safety device for wiring outlets is the ground fault circuit interrupter or GFCI.
To test a GFCI outlet, plug something into it and then push the “test” button. The outlet should immediately shut off the power. If it doesn’t, you’ll need to find the specific source of the problem and fix it before using the outlet.
Tips For Troubleshooting your GFCI Outlet
If you find that your GFCI outlet is not working correctly, there are a few things that you can try before calling an electrician:
- Double-check to ensure that all your wires are securely attached and that none touch each other or any metal surfaces.
- If your GFCI outlet keeps tripping, ensure that there is nothing plugged into it that could be overloading it—such as a hair dryer or curling iron. If nothing is plugged into it and it still trips frequently, you may need to replace it with a new one.
- If your GFCI outlet doesn’t have power, make sure that you turn off the right circuit breaker. Sometimes, there are multiple circuits in one breaker box, so it’s crucial to be sure before proceeding.
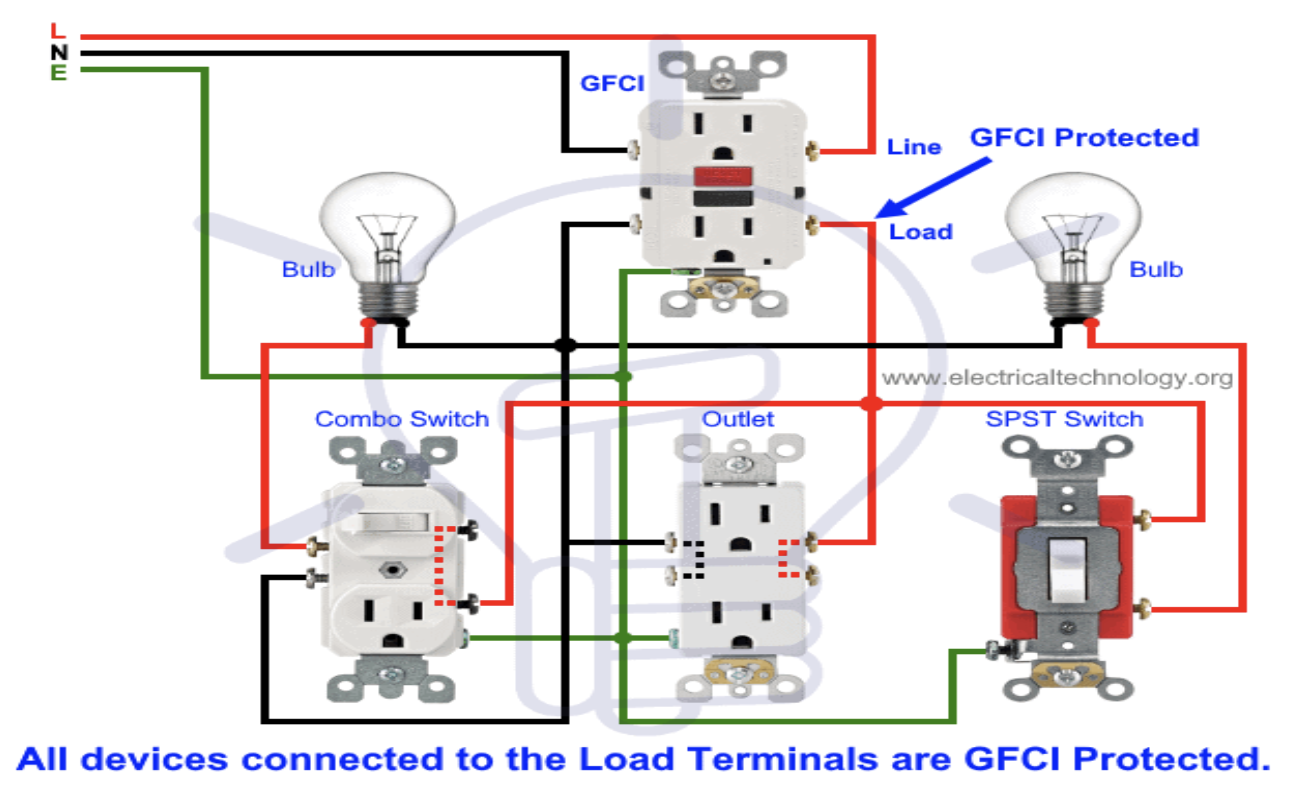
GFCI Outlet Wiring Line Vs. Load
The “line” side of a GFCI outlet is the side that is connected to the panel box where the circuit breaker is located.
The “load” side is the side that is connected to other outlets downstream from the GFCI outlet. To install a GFCI outlet correctly, you must know how to wire both the line and load sides.
-
GFCI Wiring on the Line Side
When wiring on the line side, you will connect the black (hot) wire to the brass screws, the white (neutral) wire to the silver screws, and the green (ground) wire to the green screw.
There can only be one black or white wire connected to each screw – if there is more than one wire of each color, you will need to use a pigtail connection.
-
GFCI Wiring on the Load Side
When wiring on the load side, you will again connect the black (hot) wire to the brass screws and the white (neutral) wire to the silver screws.
However, on the load side, you will not connect any ground wires directly to the outlet – instead, all of the ground wires should be connected using a pigtail connection and then connected to the green screw on the outlet.
When wiring GFCI outlets, never use paper clips or twist-on connectors – always use proper wire Nut For connecting wires. Using improper connections could result in an electrical hazard.
The Bottom Line
GFCI outlets are a must in any room with water, like the kitchen and bathroom. They’re also good in other rooms where electrical appliances or cords might come into contact with water, like the laundry room. Thankfully, they’re relatively easy to install yourself. Follow these simple step-by-step instructions, and you’ll be up and running in no time.
Install your GFCI outlet by attaching white and black terminals to the “line” side of the outlet. The bare wire should have a connection with the grounding screw. Remember to replace the cover plate and check whether the GFCI is operating correctly. The outlet should go out when you press the test button.